


By Thebudvisor.com
“The powers that be” recommend May 15th as a safe time to plant outdoors in my neck of the woods, whoever “they” are. Even if there is a freeze after you get started, a “frost cloth” will get you thru 99% of any cold snaps if you’re in the ground. If you’re growing in pots or bags, you can bring them inside for a day or two and weather the storm. Either way, when you do the math and back out the time for either seeds or clones, you should get something going by Valentines Day or St. Patty’s Day at the latest.
If you’re starting from seeds, you need to to get them ordered. They come pretty quick but it could take a week or two depending on where you’re getting them. And by the way, good seed stock is getting expensive. In Denver, the best seed stock producers are getting $20.00 per seed. Bear in mind about 1/2 will be male so if you want 10 plants you need 20 seeds. Granted you can get them for less, even free from a friend, but you very well may wish later you’d spent the extra dough when you end up with crappy genetics and you’re already into July or August.
If you have mothers, you’re going to want to flush them before cloning. That means water only for a week or 10 days before cloning. You need to reduce the nitrogen levels in the mothers to push for more rooting hormones and thus, greater success. Also, you should cut twice as many clones as you want and then take the healthiest ones. You’ll see a difference and you want the best. Cloning saves you 6 to 8 weeks over germination because you’re starting with a mature plant. You also know the plant’s a female and you know the genetics of your plants. Germinating seeds means you’re dealing with the juvenile stage and the rest is a crapshoot. You won’t even be able to sex successfully for a couple of months hopefully before you go to the trouble of transplanting outdoors.
A good light to consider is a fluorescent. They only need 120v electric and they are very efficient for germination, cloning, and the whole vegetative stage and are very reasonably priced. The 4 foot by 11/2 foot with 6 light tubes will work for you for the entire time you indoors. They are big enough to handle late-stage growth for several plants and are good for mothers for future cloning. If you want to go for more light there are other very good ones but they’ll be more expensive and they may require 240v. Some of them will require ballasts as well which are more expensive than the fluorescent fixture and you will need to add the light fixture too.
Plants need water, good water every day. If your growing for the first time you should find out about your water. You can get a breakdown from your water department if you’re on city water. If you are on a well, have it tested. It’s considered hard if it is 170 PPM and will need to be mixed with some filtered water to get it below 150 PPM. That means it’s got to much Calcium, Magnesium, and other metals. Don’t use water that is processed with a water softener as they use salt to soften it and that’s not good for plants. Your Ph should be between 6 and 7 for the best results in the dirt. For high yield production it is important to stay in these margins because the nutrients you’re providing are absorbable by the plant and if the Ph is outside of those measures, those nutrients can be locked out and therefore of little or no benefit to growth. Water pressure in a plant can be as high as 100 lbs per sq. inch. Plant strength, the sturdiness of its limbs, comes from water pressure. It’s what holds a plant upright and allows for the health of it’s circulatory system.
You’ll need to decide what nutrient solution you’re going to use. A quick note on organics. Cannabis flowers are not like tomatoes, squash or apples. They can’t be washed and wiped off. If you’re composting or using bat guano, fish emulsions, seagull guano etc. you need to protect the flowering plant from being contaminated by any of these substances. Remember you’re going to consume them and you’re not going to want to consume those kinds of things. Organic and inorganic fertilizers have the same basic 13 elements like Nitrogen, Phosphorous, and Potassium, or NPK. Organic fertilizers use bacteria to digest the elements before they are available for absorption by the plant. Inorganic nutrient salts are available for absorption by the plant immediately upon application. There are organic nutrient solutions that you can use right out of the bottle like Vegamatrix, and that’s actually Vegan as well. Whatever you’re providing your plants is going to be subject to the outdoor elements of high winds and rain and bugs and bunnies, so you’ll want to reduce the risk of contamination.
You need to decide on a medium. You can clone and germinate in rock wool and transplant into other mediums easily. If your using grow plugs they also transplant into dirt or Coco or any number of pre-mixed mediums. Or make your own. With Happy Frog or Fox Farm or Coco, you can use a 20% mix of Perlite and a 20% mix of Vermiculite works very well. Also, additives like Mykos, Veganic Special Sauce, Recharge, OG BioWare’s Root and Foliar Packs are all good for beneficial bacteria and microbial development in your medium which is hugely helpful for high yield healthy plant growth.
Now that you have a 3-month jump start on your grow, where are you going to go? Light interference is something you need to consider. Motion detectors, porch lights, street lights can completely stop your flower stage. A friend of mine had a couple plants in his backyard about 20 feet from his back door and porch light. When the plants flowered, they only flowered on the backside of the plants, away from the light. The side of the plants facing the light had no bud at all. Shade is another obvious obstacle, avoid it if possible. Bags or pots allow movement but in the ground, just remember to go for the most light.
The first stages of growth are in cubes or plugs which you’ll put into small pots or bags. Ultimately you’re going into 5 to 7 1/2 gallon containers, bags or pots. If you’re starting in February indoors, you could get by with 1-gallon containers but 2 is better (space consideration) When you move outside, go to the 5-7 1/2 gallons as these will take you thru harvest.
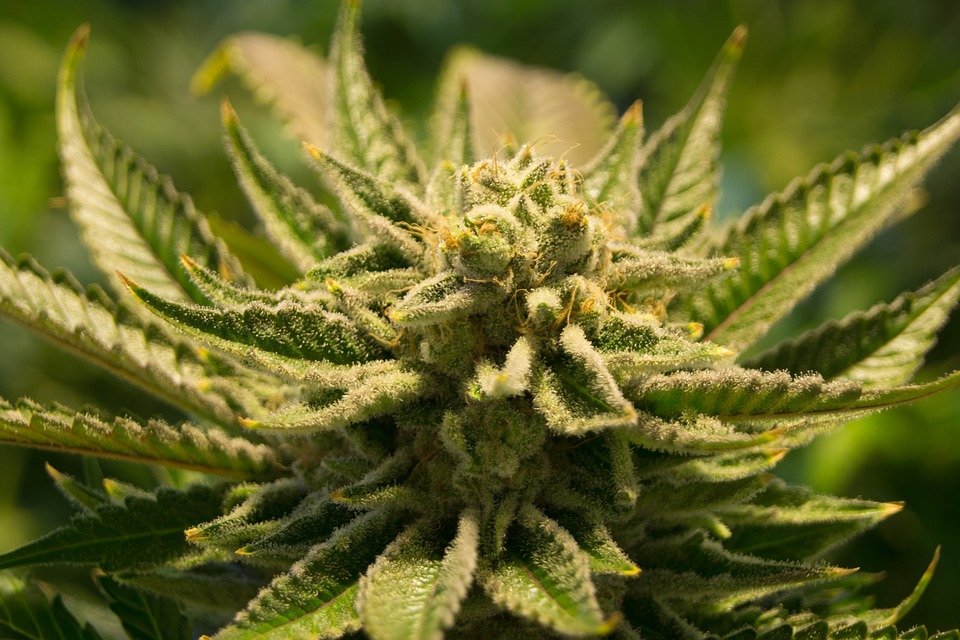
Pruning your plants is a game of dominance and important for high yield production. A plant will create as many leaves as it’s resources will allow. It’s plan is to collect as much light energy with it’s leaves as possible. The plants objective is to store as much energy as possible for reproduction. The root structures are roughly equal to the shoots. After pruning large sections of the tops and small flower buds and the fan (also called sun) leaves, the roots have excess capacity and push upward toward the remaining foliage, resulting in enhanced growth. This will ensure more grade A bud and sugary trim at harvest.
Speaking of harvest, you’re going to need to flush your plants for 3 weeks at the end of flower – before you harvest. You start with a huge reduction in nutrients. Some salts in the nutrients can assist in breaking down and exhausting or removing the nutrients. By the last week, you’re only using water. This is incredibly important for the flavor of the bud. After curing and finally smoking your bud, it won’t taste harsh or caustic. It will taste like it smelled before you harvested, that fabulous aromatic sensation, clean and pure and less harsh means less hacking.
Curing is another important step in creating the best tasting end product. Some growers recommend hanging your cuttings or small branches in a dark space at 60 degrees for a week to 10 days. I don’t think that’s practical for most home growers. Hanging the cuttings is certainly the easiest way to start. I hang them from the screen of green but you can use a clothesline in a basement or garage. Probably anywhere from 4 to 6 days, or until small branches break when bent. Then I put them into paper bags and those paper bags into large plastic garbage bags. Then you will burp (open and aerate and then close and seal) those bags for an additional couple of days. They re-hydrate, sucking the remaining moisture out of the stems and completely exhausting the chlorophyll and eliminating that green, musty smell.
Finally, it’s time to trim, lots of fun so take your time. You’re going to continue burping your bud after you trim just to finish curing and finish exhausting the last of the chlorophyll. You can use Canna Bags or jars but you will want to store the finished product in a cool dark place. Top shelves in closets work well and are cooler than kitchen cabinets. You’ll need some good snippers and take your time. You’re removing all the leaf parts of the plant which will be obvious when you’re holding a bud in your hand. If your budgets too dry, you can leave a damp paper towel on the side of the container overnight, not on the bud, and they’ll re-hydrate. Remember to keep all the trim that has sugar, trichomes, on the bud leaf. You’re going to use the trim for extracts, edibles, hash, tinctures, and balms, etc. By the way, you can juice all the leaves that you prune along the way.
Troubleshooting is going come up sooner or later. Bugs, mold, powdery mildew to name a few. All plant pests want the same thing. They all want the chemical energy made from sunlight. Actually, we all depend on it. Check your plants often as it’s a lot easier to deal with these kind of problems in the vegetative stage before you have flowers because you’re going to be spraying all the foliage. There are lots of things that come up but if your diligent and catch these infestations early they can usually be cured. Whatever you do, “Get Growing.”


